
✨ Introduction
In a world obsessed with Instagram-worthy interiors and Pinterest-perfect rooms, everyone dreams of a stylish home. But let’s be honest—decorating your walls with store-bought art can be shockingly expensive. That’s where DIY wall art steps in—not just as a budget-friendly alternative, but as a chance to infuse your home with personality, creativity, and heart.

Whether you're a seasoned crafter or someone who’s never held a glue gun in your life, this post will guide you through:
- The benefits of creating your own wall art
- The materials and tools you’ll need
- Dozens of creative ideas (categorized for easy browsing)
- A few step-by-step tutorials
- Tips for display and SEO tricks if you're a fellow decor blogger!
Ready to beautify those blank walls? Let’s dive in.
🎨 Why Choose DIY Wall Art?

💰 1. Cost-Effectiveness
Let’s be real—framed art prints can run into thousands of rupees (or dollars). Creating your own art allows you to decorate your entire home for the price of a single store-bought frame. Many projects cost under ₹200 or even zero if you're using household scraps.
🎭 2. Personalization & Uniqueness
Your home should reflect you. DIY art lets you choose your colors, themes, and textures. No mass-produced print can compete with something made by your own hands and heart.
🧘 3. Creative Outlet
Art is therapeutic. The act of cutting, pasting, painting, or arranging offers a soothing break from daily stress. It's mindfulness in motion—and the reward is something beautiful.
♻️ 4. Sustainability
Upcycling old materials like newspapers, bottle caps, and unused fabric reduces waste. It’s eco-friendly decor with soul.
🏆 5. Sense of Accomplishment
There’s something incredibly fulfilling about stepping back, looking at your finished piece, and proudly saying, “I made that!”
🧰 Essential Tools and Materials
Before diving into your first masterpiece, gather a few affordable supplies:

✂️ Basic Craft Supplies
- Scissors & craft knives
- Rulers & measuring tape
- Pencils & markers
- White glue, hot glue gun, Mod Podge
- Paints (acrylics are best), brushes & sponges
- Masking tape or painter’s tape
🖼️ Affordable Art Bases
- Cardboard
- Scrap plywood or MDF
- Canvas boards or stretched canvas (look for deals online)
- Old frames (thrift stores, anyone?)
🧵 Accessible Materials
- Yarn, string, or embroidery floss
- Fabric scraps & lace
- Magazine cutouts, newspapers, postcards
- Dried flowers, twigs, shells, buttons
- CDs/DVDs, bottle caps, old maps
🛍️ Where to Find Materials
- Local craft/dollar stores
- Thrift shops
- Online craft marketplaces
- Your recycling bin or backyard!
🖼️ Diverse DIY Wall Art Ideas (Organized by Category)
🎨 Abstract Art
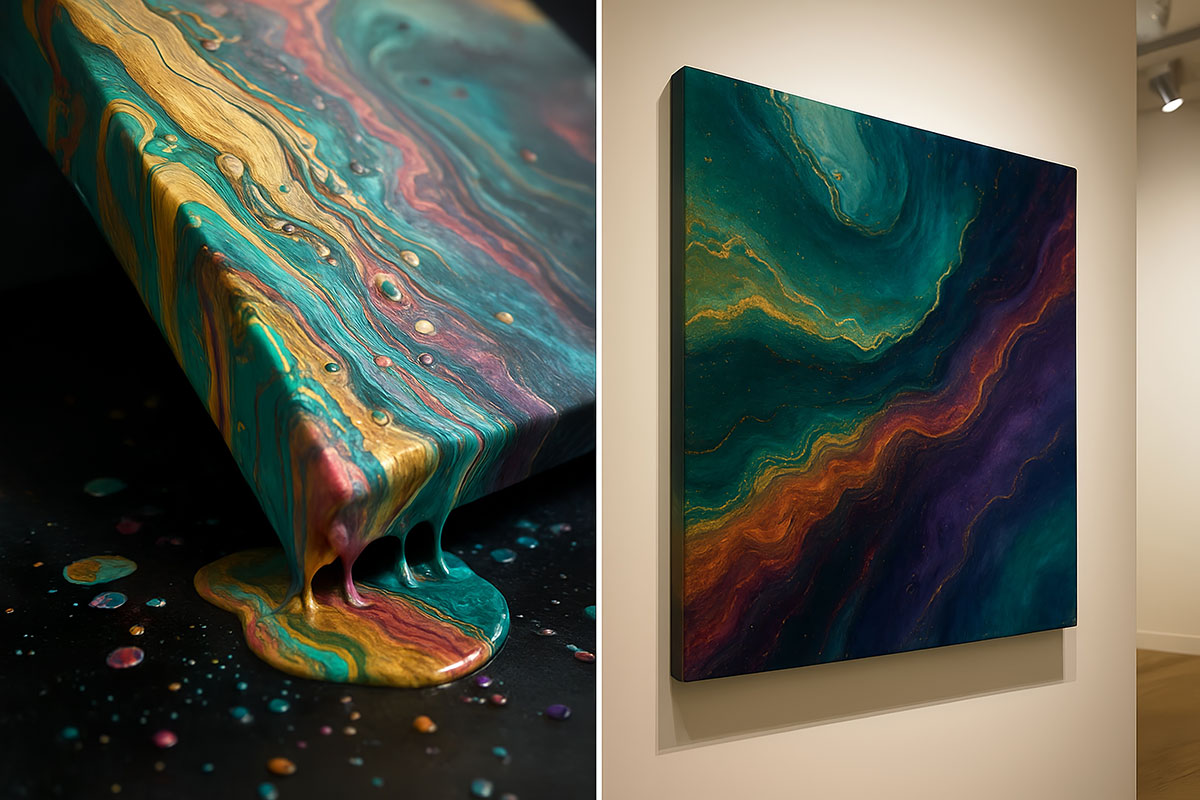
1. Paint Pouring
- Difficulty: Easy
- Materials: Acrylic paint, canvas, pouring medium
- Vibe: Swirly, marbled magic
2. Textured Art
- Difficulty: Medium
- Materials: Joint compound or spackle, putty knife, canvas
- Vibe: Modern, minimalist chic

3. Geometric Abstraction
- Difficulty: Easy
- Materials: Painter's tape, ruler, paints
- Vibe: Bold, structured, trendy

🧶 Textile & Fabric Art
1. Macramé Wall Hangings
- Difficulty: Beginner to Intermediate
- Materials: Macramé cord, wooden dowel
- Vibe: Boho elegance

2. Fabric Collage
- Difficulty: Easy
- Materials: Fabric scraps, glue, canvas/cardboard
- Vibe: Cozy, colorful patchwork

3. Yarn Wall Art
- Difficulty: Easy
- Materials: Yarn, nails, wood base
- Vibe: Stringy charm with vibrant textures

📄 Paper-Based Art
1. Pressed Flower Art
- Difficulty: Easy
- Materials: Dried flowers, glue, frame
- Vibe: Natural and timeless

2. Magazine Collage
- Difficulty: Easy
- Materials: Magazine cutouts, glue, canvas
- Vibe: Pop art meets mood board

3. Origami Wall Display
- Difficulty: Medium
- Materials: Origami paper, patience!
- Vibe: Delicate and dimensional

4. Printable Art
- Difficulty: Super Easy
- Materials: High-res printable file, printer, frame
- Vibe: Instant and stylish

🌿 Natural Elements Art
1. Branch/Driftwood Arrangements
- Difficulty: Easy
- Materials: Twine, driftwood, hooks
- Vibe: Rustic and earthy

2. Botanical Prints
- Difficulty: Easy
- Materials: Leaves, ink, paper
- Vibe: Monochrome minimalism

🔁 Repurposed/Upcycled Art
1. Button Mosaics
- Difficulty: Easy
- Materials: Buttons, glue, base board
- Vibe: Whimsical and fun

2. CD/DVD Mosaics
- Difficulty: Medium
- Materials: Broken CDs, glue, tweezers
- Vibe: Futuristic sparkle

3. Old Map Art
- Difficulty: Easy
- Materials: Vintage maps, frame, glue
- Vibe: Travel-themed nostalgia

4. Gallery Wall with Frames
- Difficulty: Easy
- Materials: Assorted old frames
- Vibe: Curated, eclectic

🎨 Stenciled & Hand-Painted Art
1. Wall Stenciling
- Difficulty: Medium
- Materials: Stencils, sponge brushes
- Vibe: Professional without the price

2. Simple Painted Motifs
- Difficulty: Easy
- Materials: Brushes, acrylic paint
- Vibe: Dots, waves, stripes—perfect for beginners

🛠️ Step-by-Step Mini Tutorials
🎨 Tutorial 1: Textured Abstract Canvas Art
Materials:
- Canvas
- Joint compound or spackle
- Putty knife
- Acrylic paint
- Sealer (optional)

Steps:
- Spread the joint compound on the canvas using a putty knife.
- Create waves or patterns before it dries.
- Let dry completely (24 hrs).
- Paint over it using acrylic colors.
- Optional: Seal for a glossy finish.

🧵 Tutorial 2: No-Sew Fringe Fabric Wall Hanging
Materials:
- Wooden dowel
- Yarn or fabric strips
- Scissors
- Twine for hanging

Steps:
- Cut yarn/fabric strips to equal length.
- Loop them around the dowel and pull tight.
- Arrange colors in patterns or gradients.
- Tie twine to both ends and hang.

🌸 Tutorial 3: Pressed Flower Wall Art
Materials:
- Dried flowers
- Cardstock or handmade paper
- Glue
- Frame

Steps:
- Arrange dried flowers on the paper.
- Gently glue each piece.
- Let it dry and place inside a frame.

🌟 Tips for Success & Display
- Start small to build confidence.
- Play with texture and contrast for visual interest.
- Mistakes = character—embrace the imperfections.
- Plan your wall layout before hammering in nails.
- Use affordable frames from thrift stores or reuse old ones.
- Enhance with lighting—spotlights or fairy lights add drama.
- Match art with room function—e.g., calm botanical art in a bedroom, playful collage in a study.
💬 Engaging Call to Action
Ready to transform your walls?
Tell us in the comments:
➡️ What’s your favorite DIY wall art idea from this post?
Or tag us on Instagram with your creation—we’d love to feature it!
Let creativity splash across your walls—one DIY project at a time.
Happy crafting!


No comments: